-
How to watch videos, DVDs and Blu-rays on iPad, iPod and iPhone
As we all know, nowadays, video and movie resources exist in different ways, the popular ones including Blu-ray movies, DVD movies and video files wrapped in various sorts of formats. These videos include MTS/M2TS, TOD, MOD, and AVI … footages shot by a camera or a camcorder, FLV/F4V files downloaded from YouTube, Hulu, Metacafe, etc. and more. Since Apple’s iPad, iPod and iPhone have strict limit on video playback, to make all videos and movies playable on them, people usually have to use third party software to help them do format conversion. To back up Blu-ray movies, you need a Blu-ray ripper, to rip DVD movies, you need a DVD ripper, and to convert video files, you need a video converter. It seems a troublesome thing to deal with all of your video and movie collections. Have you ever looked for a 3-in-one program that will give you the choice of doing everything with one product? The good new is that Pavtube Blu-ray Video Converter Ultimate provides this service. It will easily let your Blu-ray/DVD movies and any video files readable on your iPad, iPod, and iPhone. This tutorial will show you how to use this application in detail, and just check it to find out what you are looking for.
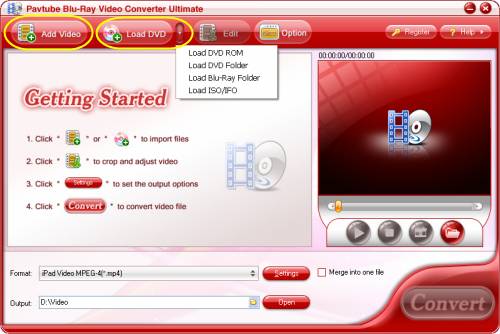
Step 1: Add Blu-ray, DVD movies and other video files
Click "Add Video" to import video files, and click "Load DVD" to import Blu-ray files and general DVD files. Four ways are available: "Load DVD ROM", "Load DVD Folder", "Load Blu-Ray Folder" and "Load ISO/IFO".
Step 2: Select output format for iPad, iPod, and iPhone
Click the drop-down list at the opposite side of "Format" to select an output format. There are specific format profiles designed for iPad, iPod, and iPhone, you can choose one according to what the output files will be used for. Furthermore, if you want to join several files to be as a single file, you can tick checkbox "Merge into one file" to realize this goal.

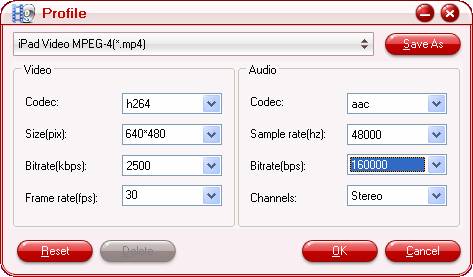
Step 3: Set advanced settings
Click "Settings" button, then you will be able to adjust video and audio parameters like codec name, bit rate, frame rate, sample rate, etc. on the interface below. Generally speaking, the larger input values will produce better file quality but with enlarged file size, on the contrary, the smaller input figures will produce the smaller file size, but with inferior file quality. That means you should make a good balance between the file size and the file quality. If you are not good at it, suggest you just skip this step, because the default settings are able to meet your needs basically.
Step 4: Start conversion
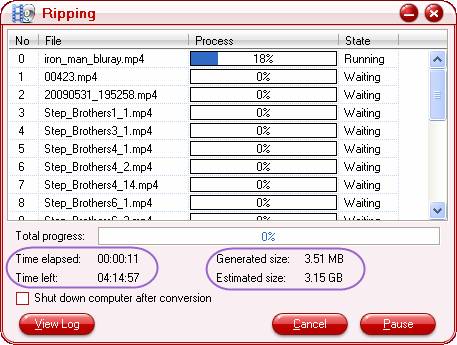
After all the above settings are completed, you can now click "Convert" button to start conversion. The detailed conversion info like total process, time elapse, time left, generated file size and estimated file size will all be shown clearly in the following window. As long as the conversion is finished, you can find out the output files via clicking on "Open" button. What you need to do next is syncing the videos to your iPad, iPod or iPhone with iTunes.